- To draw a line, choose one of the following methods:
a) Select Draw => Line from the pulldown menu.
b) Type LINE or L and press Enter at the command prompt.
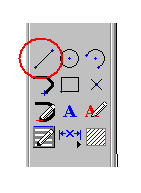
c) Choose the Line ICON from the Left Toolbar as shown below:
d) Select Draw => Palette Draw to open the draw palette and choose the ICON below.

NOTE: This ICON is remarkably similar to c) above. You can customise your desktop by dragging any ICON to the toolbar regions. For more information on the topic, please see the online Help under:
Getting Started with MSCAD 2001 => Program User Interface => Desktop Configuration.
e) For those of you used to AutoSketch, we also support the "distance"< option. You can use the mouse to define the direction of the line and type 100< at the command prompt to enter the distance.
Note the distance of 119.256 is not used, only the direction. This is a handy function for quickly drawing a sketch.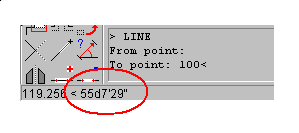
-
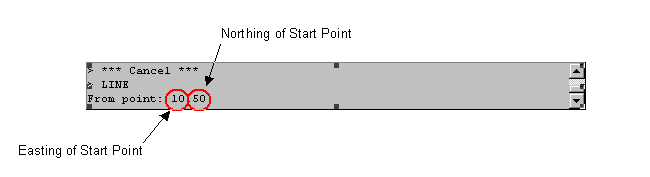
You will then be prompted for the first point of the line. You can simply pick a location on your screen by pressing the left mouse button or you can type in the location in an Easting, Northing format :
- You will then see the following screen
- You can select the next point by:
a) Picking a point on the screen using your left mouse button.
b) Enter the location in an Easting, Northing format (As in Step #2 above.)
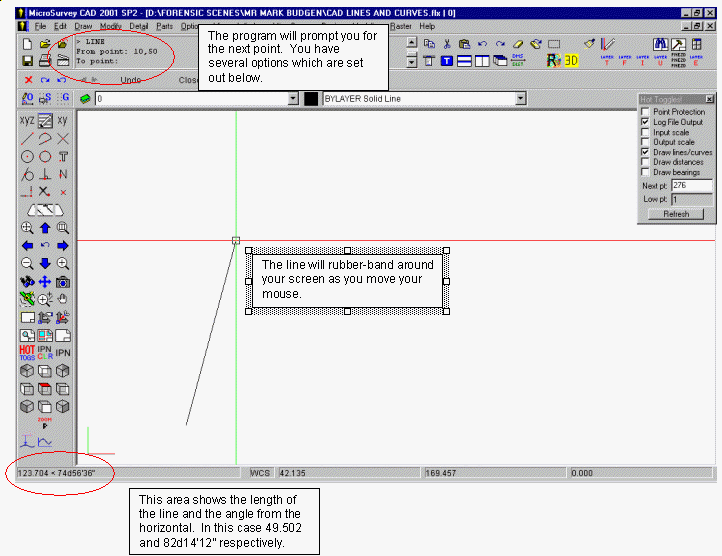
c) Enter the Distance of the line and the Angle from the Horizontal in the following format:
The @ symbol is placed before the Distance and the < symbol before the angle. The program will then draw a line 100 units long (Feet or Meters depending on your job defaults) at an angle of 58d15'48".
- You will see a line which looks like this:
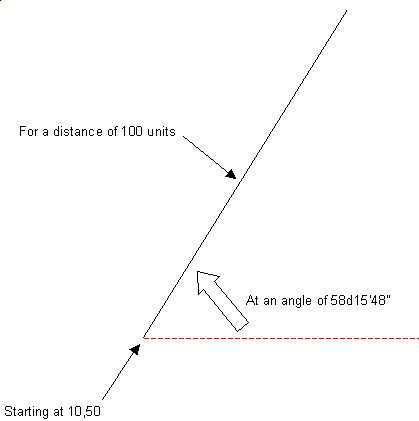
Note: The Horizontal line is for representation only. You should not see the dashed line on your screen. - You will then be prompted for the next point in the line. You will have the same options as previously mentioned for entering the next location (See step #4).
Drawing an Curve
- To draw an arc (curve), choose one of the following methods:
a) Select Draw => Arc from the pulldown menu.
b) Type ARC or A and press Enter at the command prompt.
c) Choose the Line ICON from the Left Toolbar as shown below:
d) Select Draw => Palette Draw to open the draw palette and choose the ICON below.
NOTE: This ICON is remarkably similar to c) above. You can customise your desktop by dragging any ICON to the toolbar regions. For more information on the topic, please see the online Help under:
Getting Started with MSCAD 2001 => Program User Interface => Desktop Configuration.
- You will then see the following options on the Option Bar. The Bar is located just above your Layer and Linetype information.

For further information on the options above, please see the MicroSurvey Help File under Draw => Arc in the contents field. - Depending on the option you chose from above, you will be required to enter 3 "pieces" of information to draw the arc. The information can be entered by simply selecting a location on your screen with the left mouse button or you can type the information at the command prompt. Your Object Snaps can be used when selecting locations with the left mouse button.
- The curve will be drawn in a counter clockwise direction so you should be careful in choosing your start and end points.
CAD Lines and Curves
Now that we have discussed drawing Lines and Curves, we should attempt to draw the centerline of a road using the existing alignment information that might have been obtained from a city engineering department. In sticking with the line we have already drawn, let's draw a centerline and include the following information:
Existing Information
|
Using the CAD Lines and Curves Dialog Boxes will allow us to easily enter this information to obtain the desired centerline
- To open the dialog box(es), you can simply pick on the line or curve with the left mouse button or choose MicroSurvey => Calculate Points/Lines/Curves => CAD Lines Dialog or CAD Curves Dialog. Depending on your choice, one of the following dialog boxes will appear.
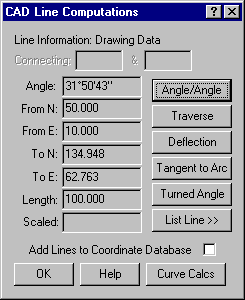
CAD Lines Dialog
CAD Curves Dialog

We have the option of "flipping" back and forth between the Lines and Curves Dialogs by selecting the Curve Calcs or Line Calcs buttons respectively. Try it out. - In this case, since we already have the tangent line (From Step #5 in Draw Lines), we will use the CAD Curves Dialog to enter the appropriate Curve information. In this case, we want to enter a Clockwise Curve with Radius 100 feet and a length of 85 feet. To do this select on the Tangent Button in the CAD Curves Dialog. This will draw a curve tangent to the existing line using the information we will input. You will be prompted to select the tangent line. Make sure you select the line near the end where you want to draw the curve. This image below shows where I picked the line.
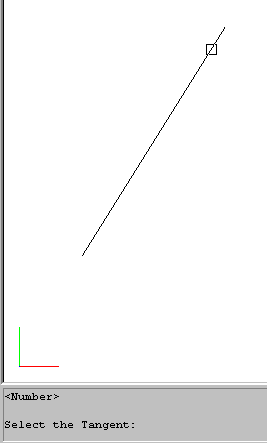
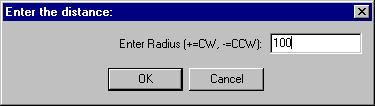
To Select the line, simply place the square over one end of the line and press the left mouse button. - You will then be presented with another dialog box prompting you to enter the radius of the curve (If you enter a positive number, the program will draw a clockwise curve and a negative radius will give a counter clockwise curve.
- Press OK and you will see the following:
As you can see, you have four options for defining the curve. See the help file or use the ? What's This Help for more information (Found in the upper right hand corner of many dialog boxes). Select the Arc Length button and you will get the following dialog.
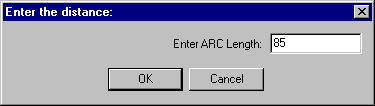
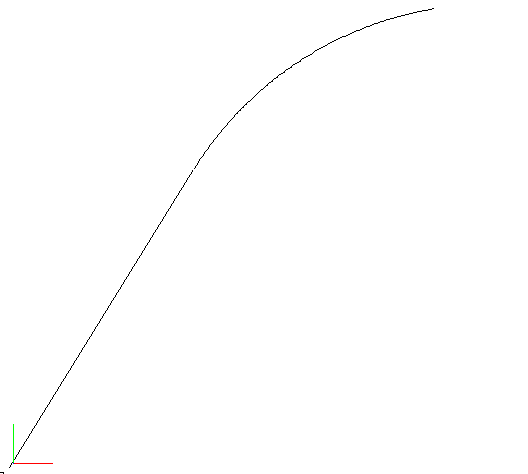
- Enter 85 for the Arc Length and press OK. The ARC will now be drawn. In order to see the whole picture, you may have to zoom out or zoom extents. You should now see an image similar to the one below.
- Pressing the right mouse key, Esc or Enter will bring back the CAD Curves Dialog. We now want to choose on the Line Calcs button in the lower right hand corner. This will bring the CAD Lines Dialog into view. Select on the Tangent to Arc button.
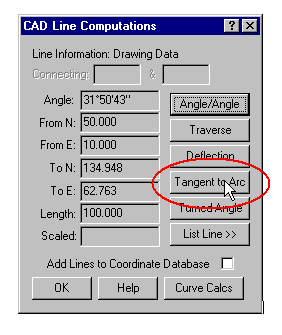
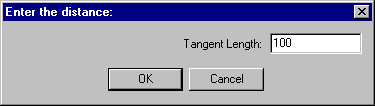
- Select the arc and enter the length of the tangent. In this case 100 feet. Press OK.
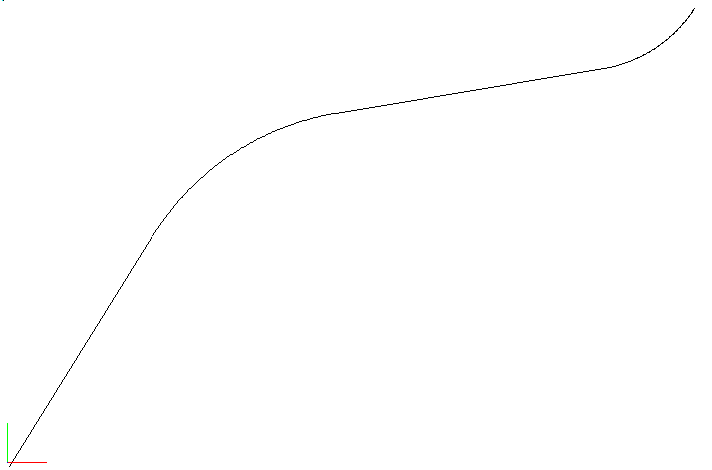
- Again, you should press the right mouse button, Esc key or Enter on the keyboard to bring back the CAD Lines Dialog. You can now enter the remainder of the data from above
Counter Clockwise Curve - Radius 50 feet (Remember the "minus sign") - Arc Length 42 feet. - You will then have a drawing which looks like this.
You have just completed drawing the centerline of a road. You can build the rest of the road information by offsetting the centerline the appropriate distances.
Created on: April 11, 2001
Jason Poitras
Comments