Check out the other AutoMap Articles:
Part 1 - Part 2 - Part 3 - Part 4 - Part 5 - Part 6 - Part 7 - Part 8 - Part 9 - Part 10 - Part 11 - Part 12
Introduction to AutoMap
AutoMap is a system of automated drafting tools that can help you organize many tasks. In general, the AutoMap routine allows you to work with your field codes and to assign attributes to points and linework as they are drawn in the CAD file.
Some functions of AutoMap include:
- Assigning a symbol of your choice on each point based on description
- Move descriptions, points, elevations, and points to a layer of a given name
- Scaling a symbol to further customize each object
- Connecting points using the line connectivity function
- Further customizing linework with specific layers and line types
AutoMap essentially minimizes the editing needed after processing.
An AutoMap library is a collection of field codes and attributes you want to assign to each code. Most MicroSurvey users develop an AutoMap library unique to their needs to help provide a consistent appearance to drawings and to minimize manual drafting tasks.
The AutoMap editor can be found in the MsTraverse Ribbon of MicroSurvey CAD, embeddedCAD, inCAD or SurveyTools for BricsCAD. It can also be located by typing “automap_editor” in the command line.
In the AutoMap editor you can view the current library or open a new library. We provide some examples of libraries with the file extension *.csv in:
| Product | Location |
| FieldGenius Legacy | C:\ProgramData\MicroSurvey\FieldGenius\##\Templates |
| MicroSurveyCAD | C:\ProgramData\MicroSurvey\MSCAD\####\mscad |
| embeddedCAD | C:\ProgramData\MicroSurvey\embeddedCAD ####\mscad |
| inCAD | C:\ProgramData\MicroSurvey\inCAD\####\mscad |
| SurveyTools for BricsCAD | C:\ProgramData\MicroSurvey\SurveyTools ##.# for BricsCAD\mscad |
Let’s look one up by picking on “open library.” I have chosen the “survey.csv.” The field codes located in this document (.csv file) coincide with typical land surveying objects such as “BLDG” for building.
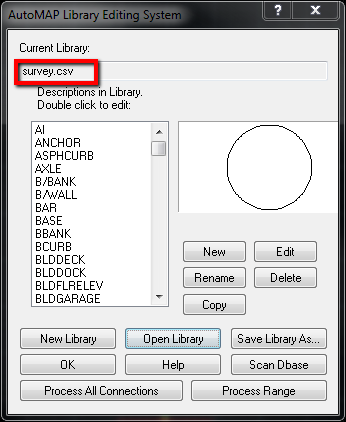
You can use the list of sample descriptions that are provided when you download the software but in time you'll want to create your own. You can start a completely new AutoMap entry by pushing the “New Library" button this will clear your current library.
Check out the other AutoMap Articles:
AutoMap Part 2: Assigning a Symbol to a Field Description
AutoMap Part 4: Symbol Rotation for Natural Features
AutoMap Part 5: Symbol Scaling Using Field Coding
AutoMap Part 6: Symbol Rotation Using Field Coding
AutoMap Part 7: Symbol Orientation Relative to Another Point
AutoMap Part 8: Symbol Rotation and Scaling Relative to Another Point
AutoMap Part 9: Creating Symbols
AutoMap Part 11: Quick Posts with Wipeouts
AutoMap Part 12: Custom Annotation using Field Coding or Substitution Coding
Part 1 - Part 2 - Part 3 - Part 4 - Part 5 - Part 6 - Part 7 - Part 8 - Part 9 - Part 10 - Part 11 - Part 12
James Johnston
Comments