Your drawings will appear more professional and complete with the addition of details like trees and hedge lines. Using MapScenes PRO, go under the MapScenes Menu to -> Custom Line -> Tree/Hedge Border. Using MapScenes 2006, go under the MsLabeling -> Add Advanced Linetypes -> Tree Line.
Draw straight lines that convert to a Tree/Hedge line after pressing Enter. The scalloped line will be drawn on the right side of the line, in the direction it was drawn, using the current text size to determine the size of the scallop. If you draw a Tree/Hedge line and the scallops are the wrong size, you can erase the line. Then set the desired text size and redraw the Tree/Hedge line.

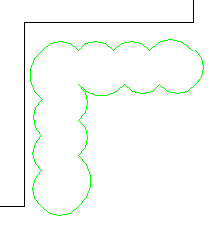
Left picture above - Green lines tracing the hedge as the command is running. Right picture above - Hedge after command is completed.
To set the correct text size in MapScenes Pro., go to the Text menu -> Presized Text Styles -> Leroy -> and then pick the size of the text desired.
To set the correct text size in MapScenes 2006, go to the MsLabeling menu -> Ms Text -> Regular -> and then pick the size of the text desired.
When the text dialog or prompt comes up on screen, click on Cancel. This has the effect of setting the desired size, and since you do not want to enter any text, hitting Cancel exits the command. Now you can run the Tree/Hedge line command and the new text size will be used to form the scallops.
Jason Poitras
Comments