Why is the drawing scale so important?
How does the drawing scale affect my text sizes and symbol sizes?
How do I know what value to use for the drawing scale?
How can I get consistency between the different scenes I have to prepare?
How do I figure out the correct text height to use?
These are just a few of the questions handled by our technical staff, on the topic of Drawing Scale and Text Sizes. What are the answers to these and related questions? The following document will help to answer all your concerns.
Drawing Scale
The drawing scale is one of the more important items to be setup when you start a scene. The drawing scale is used in MicroSurvey Products to help automate many of the tedious tasks that other programs force you to manually do. But before we explain how the drawing scale is used - we need to define what the drawing scale is and how to calculate the value to use.
When you are on a scene in the field, you measure all of the distances to the appropriate objects. These distances are known as true or real distances. When you return to the office you need to prepare a paper drawing to accurately depict what you saw and measured in the field. The ratio between the real distance and the drawn distance is the drawing scale.
e.g. You measure a real distance of 200 feet in the field. On paper you wish to draw that line so it is 8 inches long. So 8 inches on paper = 200 feet on the ground. If you simplify that you have 1 inch = 25 feet (same thing just reduced to the simplest expression). This means you would be drawing the diagram on paper at a scale of 1"=25'.
How large of a piece of paper do you need to draw this scene up using this scale? You will have to know what your longest measured distance is in the field, then apply the drawing scale to that distance to see how many inches of paper you would require.
e.g. If the longest distance measured in the field was 300 feet and my drawing scale I want is 1"=25', then the minimum length of paper I need to draw this would be 12". (300 / 25)
This is the old hand method of doing things. Taking a ruler or scale and manually reducing all of your real measurements so they would match the drawing scale. But what if you do not know what drawing scale will fit your paper and still accurately show the real measurements? How do I fit the entire scene onto a specific size piece of paper?
e.g. You have measured a scene and the it is 1200 feet long and 100 feet wide. You need to present, to the court or lawyer, a drawing on a 8 1/2" x 14" piece of paper. How do you calculate the drawing scale? Assuming that the long length in the field will be drawn in the long axis of the paper, and lets say you can only draw to within 1 inch of either edge of the paper. So, 1200 feet measured in the field must be drawn on 12 inches of paper. The drawing scale would be 1" on paper = 100' real distance. Or simply put the drawing scale would be 1"=100'. Once you have figured out the drawing scale for the length, you should confirm that the width of the scene will fit on the paper as well. In this example, a scene width of 100 feet at the drawing scale shown would only require 1" of paper to draw it. We have 8 1/2" so it will fit quite nicely.
This is what you have had to do for many years when drafting by hand. So what is new or different now? Well, your pencil or pen is now a keyboard or mouse. Is this really that different? The answer is Yes and No.
Do I need to do all this drawing scale calculation stuff for the computer? Yes you do. The computer will always enter and locate all of your scene data and measurements in the real units you used. So 1000 feet in the field is 1000 feet in the computer. As you are working on a scene in the computer, the linework is never scaled. Scaling of the linework only comes at the very end, when we make a copy to paper.
If the computer works in real distances, just like you do in the field, why do we have to enter a drawing scale at the beginning of the drawing?
Two items that the computer must manage and setup correctly are TEXT and SYMBOLS. For the computer to do this correctly and consistently it must know the drawing scale. MapScenes, MapScenes Pro and MapScenes 2006 all have the ability to enter text and symbols in the drawing and automatically make them the correct size so when you plot the drawing on paper, using the drawing scale, they will be the correct size.
Text Sizes
We provide you with a menu of text sizes that are automatically scaled to be correct for plotting to paper.
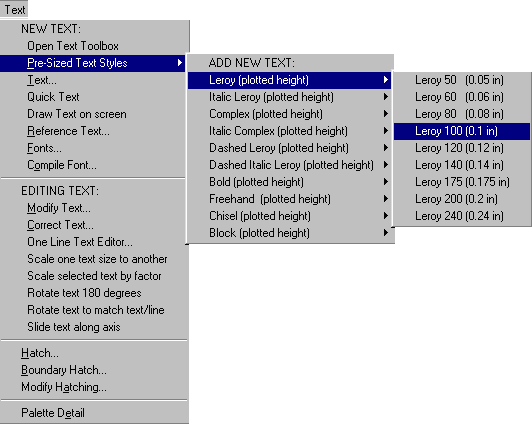
In Older MSCAD, MapScenes and MapScenes Pro look under the Text pulldown menu -> Pre-Sized Text Styles. In here you will see many different styles of text that we have provided to you. Each one with several different preset sizes or heights. (see below)
In MSCAD 2005 or MapScenes 2006 look under the MsLabeling pulldown menu -> MS Text. In here you will see many different styles of text that we have provided to you. Each one with several different preset sizes or heights. (see below)
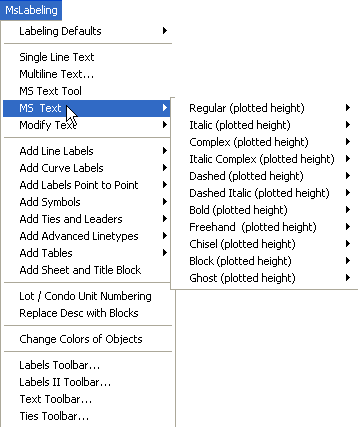
The size or height of the text is shown in what are known as Leroy sizes and then in brackets we also show the height in inches (or mm for those working in metric). The height is what you will see and be able to measure on paper after we print the drawing out.
So in the first picture above, we have selected the "Leroy 100 (0.1 in)" menu item. If you enter text using this selection, the text, when placed on the screen, will be automatically made large enough so that when we finally print this drawing to paper, the height of the text will be exactly 0.1 inches high.
This means that if you measure the height of the text on screen it will NOT be 0.1 inches high. It will be (0.1 x the drawing scale) high. So we are automatically using the drawing scale to ensure that the text is made large enough so when you print it to paper, it will be the correct and consistent size.
In other programs you have to manually setup a style of lettering at the height you desire - which means you had to do all the math and configurations yourself. MapScenes. MapScenes Pro and MapScenes 2006 take all this worry away from you and only requires you to select the height of text you wish to use. We take your drawing scale and figure everything out for you so all you have to do is pick the desired text height and enter the text to be placed on the drawing - we do the rest for you.
The text is placed on the current layer, with the height chosen, in the location and with the rotation you pick. If the text style did not previously exist in the job then it creates it automatically. If it was already used once before in that job then it will simply use it again.
Symbols
The drawing scale also controls the size of symbols being placed in the drawing. With the drawing scale set, we know what size to insert the cars and other symbols, so they are correct when you measure them in real units on screen as well as after they are printed to paper. You need only pick the symbol of choice and then pick the location on screen. Then rotate the symbol for final placement - we worry about the size internally so you do not have to.
Manually placed symbols are one way to insert symbols but the other method we have available is via the AutoMAP command. In there we still control and adjust the symbols to make them the correct size, based upon the drawing scale as well as a manual scale factor which you can apply your own value for. This scale factor allows you to make the fine adjustments you require to get the end product desired. The factors are saved and used in AutoMAP for all drawings so once setup the drawing scale is the value that will control them to ensure they are consistent in size.
In MapScenes go to the MapScenes pulldown menu -> Drawing Utilities-> Re-scale Complete Drawing.
In MapScenes Pro go to the MapScenes pulldown menu -> Drawing Utilities-> Re-scale Text in Drawing.
In MapScenes 2006 go to the MsPoints pulldown menu -> Re-scale Drawing Text.
This command (different menus but the same command in each program) may be a slight misnomer as it does not do the entire drawing - although it does do a lot of it.
If you started your scene with a drawing scale of say 1"=40' and later determine that you wish to change it to 1"=50", with no changes to the drawing, the text and some of the symbols would be the wrong size, when printed out on paper. This command allows us to update some of the text and symbols, to compensate for the new drawing scale.
If you plot the drawing at 1"=50' but had originally set the drawing scale to 1"=40 feet, then the leroy 100 (0.1 inch) high text would not print at 0.1 inches high on paper. It would instead be 0.08 inches high. Now this may not sounds like a huge difference but make the drawing scales different by a larger value and this will increase. This means that some drawings you do like this may have text that you can not read or is way too large. It also means if you have several drawings to present in court, they will not be consistent and this may lead to questions.
This command will automatically adjust the Distances, Point Numbers, Descriptions, Elevations and symbols inserted via AutoMAP to match the new drawing scale. This means they will now be correct again, when printed on paper. (These items are connected to our external database so we know how to manipulate them as required where other text and symbols are just sitting in the drawing and not connected to the database and can not be automatically adjusted.) If you have done any editing such as moving the points (Distances, Point Numbers, Elevations or symbols inserted via AutoMAP) to another layer, we will put them back to the default layer, or the layer setup via AutoMAP, with their original orientations, when this routine is run.
Other text and symbols entered in manually (including text entered via the pre-set leroy text sizes), would need to be rescaled manually using either the Scale command under the modify menu, or the Text Scaling options under the Text menu (In MapScenes 2006 go to the MsLabeling menu -> Modify Text), as appropriate.
This command does help save you time if you do need to change the drawing scale, but some manual cleanup is still required to complete it. This is why it is important to set the drawing scale correctly when first starting the scene.
Printing / Plotting
When you are finished the drawing and wish to print / plot it to paper, you must set the print / plot scale so it will be the correct size on paper. In order to be consistent you must set the print / plot scale to the same value as the drawing scale. This way everything affected by the drawing scale (as discussed above) will be the correct size on paper.
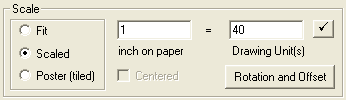
In MapScenes and MapScenes Pro., make sure the print dialog box, under the scale section, is set to Scale and not Fit or Poster(tiled). You also must ensure you have the correct units selected on this dialog. For Feet set it to inches and for Metric set it to mm.
In MapScenes 2006, make sure the Print Scale portion of the dialog is set correctly.

If the drawing scale was 1"=40' then in the print dialog you must set the "inch on paper/Printed units" to 1 and the "drawing unit(s)" to 40. If you are working in metric then if you had a drawing scale of 1:250 then in the print dialog you must set the "mm on paper/Printed Units" to 1 and the "drawing unit(s)" to 0.25.
By doing all of this the drawing will be output to paper at the correct and consistent size and scale.
We hope this discussion has helped clarify the need for setting the drawing scale correctly when you first start a new scene, and what is affected by the drawing scale.
Glen W. Cameron, CET
Technical Support Manager
Created on: January 25, 2001
Jason Poitras
Comments