Various Surveying programs, such as Carlson, Eagle Point, Land Development Desktop and Civil 3D store point information as "Point Blocks" in the dwg file. If you need to extract this information into the MicroSurvey Points database, we have a utility to help you. This utility can be used to import points from any of the above mentioned programs, here are a few examples so you can see how it works:
See this video for steps to importing Eagle point blocks.
Follow the article below for the steps to import Carlson pointblocks:
Open Points | Import/Export | Carlson | Import Pointblocks:
or:
_import_generic_pointblock
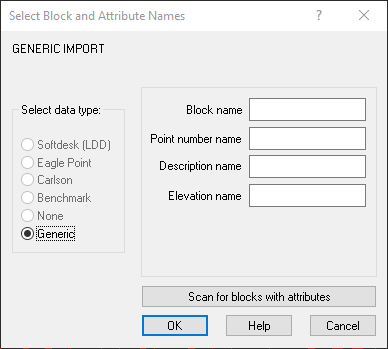
This dialog prompts you to specify point block attributes. The points will appear in the Active Coordinate Editor with the original point number and description.
Next, you will need to list a point block to determine the correct Attribute names. Type List in the command line, Enter, Pick a Point Block, enter, and hit “F2”
Below is an example of the attributes from a Carlson Point Block. Note the items in Red:
---------- Insert of Block ----------------------------------------
Handle: 1DDBB
Current space: Model
Layer: MISC
Color: BYLAYER
Linetype: ByLayer
Lineweight: -1
Block name: SRVPNO1
Insertion point: X= 10048.99 Y= 10036.40 Z= 151.02
X scale factor: 3.20
Y scale factor: 3.20
Z scale factor: 3.20
Rotation angle: 0°0'0"
# colums: 1
column spacing: 0.00
# rows: 1
row spacing: 0.00
---------- Block Attribute 1 --------------------------------------
Handle: 1DDBC
Current space: Model
Layer: PNTNO
Color: BYLAYER
Linetype: ByLayer
Lineweight: -1
Text style: PTXT
Text start point: X= 10047.92 Y= 10038.80 Z= 151.02
Value: 7
Text rotation: 0°0'0"
Generation: Normal
Horizontal alignment: Center
Tag: PT#
Attribute Flags: Normal
Field length: 0
Vertical alignment: Baseline
---------- Block Attribute 2 --------------------------------------
Handle: 1DDBD
Current space: Model
Layer: PNTELEV
Color: BYLAYER
Linetype: ByLayer
Lineweight: -1
Text style: PTXT
Text start point: X= 10053.79 Y= 10034.80 Z= 151.02
Value: 151.02
Text rotation: 0°0'0"
Generation: Normal
Horizontal alignment: Left
Tag: ELEV2
Attribute Flags: Normal
Field length: 0
Vertical alignment: Baseline
---------- Block Attribute 3 --------------------------------------
Handle: 1DDBE
Current space: Model
Layer: PNTDESC
Color: BYLAYER
Linetype: ByLayer
Lineweight: -1
Text style: PTXT
Text start point: X= 10043.12 Y= 10030.80 Z= 151.02
Value: COGO
Text rotation: 0°0'0"
Generation: Normal
Horizontal alignment: Center
Tag: DESC2
Attribute Flags: Normal
Field length: 0
Vertical alignment: Baseline
------ End Insert of Block -------------------------------------
Handle: 1DDBF
Current space: Model
Layer: MISC
Color: BYLAYER
Linetype: ByLayer
Lineweight: -1
Number of attributes: 3
---------- Insert of Block ----------------------------------------
Handle: 1DDB9
Current space: Model
Layer: MISC
Color: BYLAYER
Linetype: ByLayer
Lineweight: -1
Block name: spt9
Insertion point: X= 10048.99 Y= 10036.40 Z= 151.02
X scale factor: 3.20
Y scale factor: 3.20
Z scale factor: 3.20
Rotation angle: 0°0'0"
# colums: 1
column spacing: 0.00
# rows: 1
row spacing: 0.00
---------- Point --------------------------------------------------
Handle: 1DDBA
Current space: Model
Layer: MISC
Color: BYLAYER
Linetype: ByLayer
Lineweight: -1
Point: X= 10048.99 Y= 10036.40 Z= 151.02
Angle of X axis: 0°0'0"
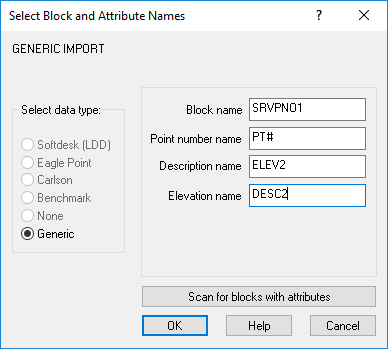
This tells us how to configure the "Block and Attribute Names" dialog.
|
Attribute Name: |
Listing Entry: |
|
Block name |
From the "Insert of Block" section: Block name: SRVPNO1 |
|
Point Number name |
From the "Block Attribute 1" Section: Tag: PT# |
|
Description name |
From the "Block Attribute 3" Section: Tag: DESC2 |
|
Elevation Name |
From the "Block Attribute 2" Section: Tag: ELEV2 |
Configure the dialog as below:
Hit "OK"
When prompted "Do you want to select the Point Blocks to Import? select "Yes"
Window in the part of the drawing that contains point blocks
You will be asked if you want to delete the original point blocks. For the first time, say "no"
And then the point database will be populated with points that match the Pointblock attributes. If you find everything looks right, restart the process and this time select "Yes" to deleting the original blocks, you don't need them anymore.
James Johnston
Comments