October 20, 2002
Automated line drawing using Z-Coding option
In the example diagram below we have both Z and X codes in use to draw lines and curves.
The diagram shows a road that transitions from a straight line into a curve then stops. Then a second line using the same descriptions starts and then stops.
By adding the 1 letter prefix to each description you can control how the linework is drawn.
Starting at point 106, the description of EP is placed on each point. The prefix of Z is added to draw straight lines. The prefix of X draws curved polylines, and no prefix ends the line for that description.
In the diagram shown, Point 106 has a description of ZEP which tells us to start drawing a line from this point to the next point in the drawing, in increasing point number order, with the same description. So a line is drawn to point 107 because it has a description of EP as well. Point 107 also has a prefix of Z so another line is then drawn from 107 to 108. 108 had the same description as 107 and 106. 108 has a Z as well so it would continue the line to the next point with the description of EP.
However, point 109 has a description of EP with the prefix of X. The X tell us to draw a curve (curved polyline) back to the previous point with the same description, 108 in this case. The X code over-rides the Z code so a curve is drawn instead of a line.
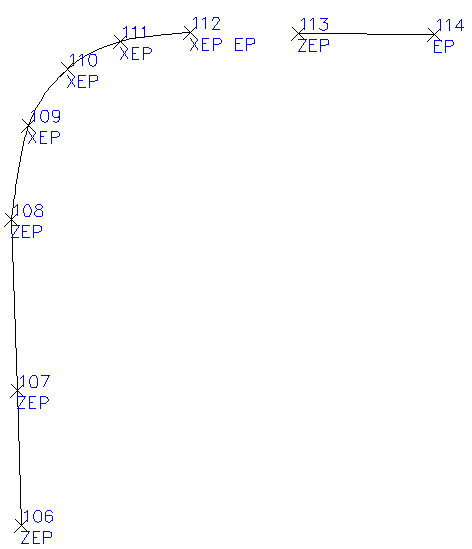
Points 109, 110 and 111 all have the same EP description with the prefix of X so a continuous curved polyline is drawn between them.
Point 112 is where we want to end the curve. Normally if you simply remove the prefix, a line would stop at that point. But because we want a curve to stop there and not a straight line, we have to code it as shown. We put the X as the prefix with the description of EP, just like the previous points BUT to end the curve there you must the add a space and then repeat the description again. This gives us XEP EP as the description for this point.
The description of EP can now be used in another location in the job to code another line or curve without joining back to the end of this curve.
The next line starts at point number 113 and with the prefix of Z, joins to the next point with the same description. Point 114 is where we want to stop the line so we remove the prefix leaving you with just EP as the description.
The description of EP can now be used in another location in the job to code another line or curve without joining back to the end of this curve.
After coding the points in the field with the correct descriptions with the appropriate prefixes, and processing the job, as appropriate, to see the points on screen, we need to draw the linework.
In MicroSurvey CAD 2002 or InCAD:
Go to the MicroSurvey menu -> AutoMAP System -> Connect Points by XYZ.
In MSX:
Go to the Labeling menu -> AutoMAP System -> Connect Points by XYZ.
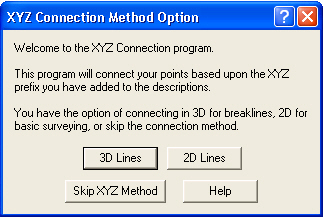
When you see the following dialog, pick on 2D Lines.
Then we have the ability to strip off (or blank) all the 1 letter prefixes you used and leave you with just the description. So all the ZEP and XEP codes would be changed to just EP both in the drawing and the database.
This helps keep the database and drawing clean. If you wish to do this then pick on the YES button on the following dialog. Picking No will leave them alone which means they still have the X and Z prefixes on the points.
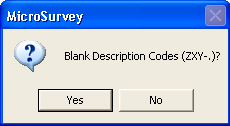
CAUTION: If you do blank the prefixes, you will not be able to rerun the Z-Coding again as the blanking step is not reversible.
Glen W. Cameron, C.E.T.
Technical Support Manager
Jason Poitras
Comments