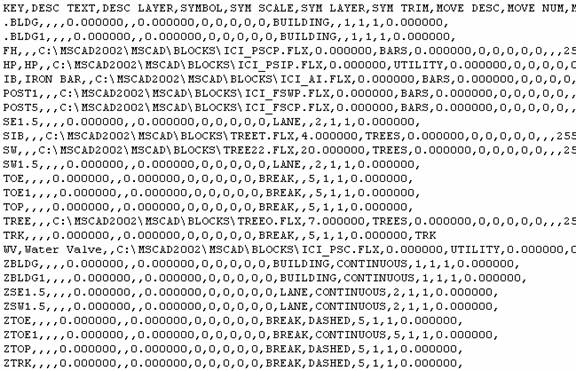
MicroSurvey CAD has a lot of power, but to make it easier for everyone to use it, the program can be customized. Lets take a look at one file that allows you to customize your input to match the way you work. The file \MSCAD2002\CFG\MICROSURVEY.KEY has many sections in it that can all be customized.
Do not remove or change any of the headings in thefile shown inside the [brackets].
This note is placed at the top of the file.
This is an example which might be installed in the user's cfg directory
Note: Short-Cut definitions may contain transparent (') and ESC-
characters (^^), whereas with aliased commands these control
sequences are igonored !
The first portion of the file contains all the function key combinations available. All you need to do is add a command after the = sign. Then while in the program, if you press this function key, the command you have assigned to it will be run. Here is a portion of this segment. There are 3 sections here, the Function key alone, the Function key preceded by the Ctrl Key, and finally the Function key preceded by both Ctrl and Alt keys.
Each of these can be set to different CAD and Survey commands. The ' character makes the command transparent so it will run inside of another command. The ^ character is the same as pressing the ESC key to cancel a command. We normally have 2 of them together to ensure all previous commands have been cancelled before starting a new command.
The Function Keys portion of this file can also be accessed directly from inside the program by typing the command CONFIG and then picking the HOT KEY tab.
[ACCELERATOR KEYS]
F1=*ignored*
F2='TSCREEN
F3='REDRAW
F4=^^REGEN
F5=x,y
F6=x,y,z
F7='TGRID
F8='TORTHO
F9='TSNAP
F10=*ignored*
F11=x,y,z
F12=
Ctrl_F1=*ignored*
Ctrl_F2=^^mseditor
Ctrl_F3=
Ctrl_F4=*ignored*
Ctrl_F5=
Ctrl_F6=*ignored*
Ctrl_F7=
Ctrl_F8=
Ctrl_F9=
Ctrl_F10=
Ctrl_F11=
Ctrl_F12=
Ctrl_Alt_F1=*ignored*
Ctrl_Alt_F2=
Ctrl_Alt_F3=LISTP
Ctrl_Alt_F4=
Ctrl_Alt_F5=
Ctrl_Alt_F6=
Ctrl_Alt_F7=
Ctrl_Alt_F8=
Ctrl_Alt_F9=
Ctrl_Alt_F10=
Ctrl_Alt_F11=
Ctrl_Alt_F12=(f:load f:usertext"usertext");(defun C:XS () (f:usertext nil))(princ);XS
The next segment of the MICROSURVEY.KEY file has Ctrl keys setup with letters to allow a more direct command relationship. You can setup as many of these as you require. Simply follow the format show but use the Letter and Command you wish instead of ones shown below. Feel free to add other letter keys as you desire.
[CONTROL KEYS]
Ctrl_G=^^COGO
Ctrl_D=^^deletep
Ctrl_L=^^listp
Crtl_N=^^NEW
Ctrl_O=^^OPEN
Ctrl_P=^^point_pro
Ctrl_S=^^angles_right_report
Ctrl_T=^^cnf_edit_toggles
The next segment is a list of commands found on the Option Bar (or Option Menu ) when no command is running. The option bar is found at the top of the drawing screen below the command prompt area.
Option Bar:
![]()
Option Menu:
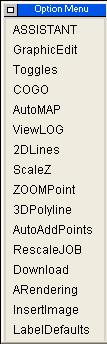
You may change the commands, change the order of the commands or add your own, as you desire. The number of commands that you can see on the option bar will vary depending upon the resolution of your screen. If the list is too long to view them all then you will see two little arrows at the left end of the option bar that allow you to scroll to the remainder of the commands:
[CONTEXT BAR]
ASSISTANT=^^assistant
GraphicEdit=^^graphic_editor
Toggles=^^cnf_edit_toggles
COGO=^^COGO
AutoMAP=^^automap_editor
ViewLOG=^^mseditor
2DLines=^^connect_points
ScaleZ=^^scalez
ZOOMPoint=^^zoomp
3DPolyline=^^POLY3D
AutoAddPoints=^^auto_add_database
RescaleJOB=^^ms_rescale
Download=^^download
ARendering=^^ARENDER
InsertImage=^^rladen
LabelDefaults=^^cnf_edit_bearings
The Context Menu can be found, when no command is running, by holding the Ctrl key down and picking with your left mouse button, at the same time.If you are using a 3 button mouse or a Microsoft Intellimouse, the middle button will pop up the context menu. A little floating menu will appear with the following commands on it.
As in the above segments, you can customize this to display the commands of your choice. The wording on the left of the = sign is what appears on the menu, the command is on the right of the = sign. SEPARATOR= is a blank line to help group like commands.
[CONTEXT MENU]
MSCAD Project Manager...=^^project_manager
Main Job Defaults...=^^cnf_edit_general
AutoMap System...=^^Automap_editor
Auto Add Objects=^^auto_add_database
SEPARATOR=
Delete Points=^^deletep
Add/Edit Points=^^editp
List Points=^^listp
Renumber Points=^^ms_start_renumber
Scale Points=^^ms_scalepts
Shift Points=^^ms_shift
Zoom to a Point=^^zoomp
SEPARATOR=
Edit Units Settings...=^^UNITSETUP
SEPARATOR=
Preferences...='SETTINGS
The next portion of the MICROSURVEY.KEY file controls the buttons on your mouse.‚
[BUTTON MENU]
RButton=
MButton=[CONTEXT MENU]
With the Middle Button set to=[CONTEXT MENU], this brings up the context menu when you hit the middle mouse button.‚ When you are in a command this brings up the Object Snaps.
The last portion of the MICROSURVEY.KEY file are simple alias commands. On the left side of the = sign is the letter combination that you wish to type, on the right side is the command it runs. This allows you to setup simple short key strokes so they will run commands of your choice. As with the previous segments, the commands can be CAD, or Survey related. The Alias portion of this file can also be accessed directly from inside the program by typing the command CONFIG and then picking the ALIAS tab.
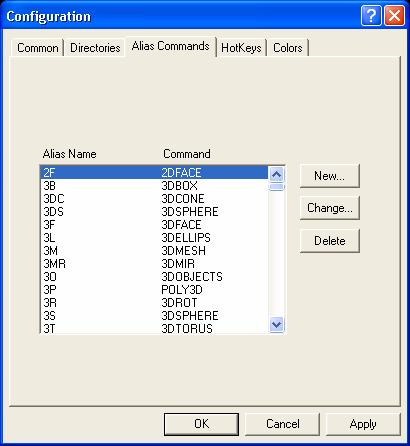
(only a portion of the list is shown below to keep this short and clean)
[ALIAS COMMANDS]
2F=2DFACE
3B=3DBOX
3DC=3DCONE
3DS=3DSPHERE
3F=3DFACE
3L=3DELLIPS
3M=3DMESH
3MR=3DMIR
3O=3DOBJECTS
3P=POLY3D
3R=3DROT
3S=3DSPHERE
3T=3DTORUS
3V=3DVIEW
3W=3DWEDGE
?=HELP
CI=cont_interval
TL=(f:load f:usertext"usertext");(defun C:XS () (f:usertext nil))(princ);XS
VERY IMPORTANT NOTE:
Make a copy of this file somewhere safe to ensure that we do not over ride it when we supply you with updates or upgrades.This file, when configured, can make your life a lot more comfortable and help save you time searching for the commands you need.‚ (You may not be able to simply replace our file with your edited one in future versions but you can copy the pertinent portions of the file, as desired.)
Created on: December 14, 1998
Jason Poitras
Comments