We have had several clients call me asking how to open a drawing.
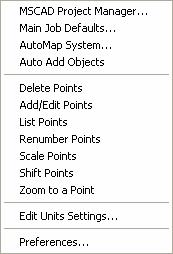
The correct way to open ANY drawing files (DWG, DXF or FLX) is to use the Project Manager, found at the very top of the File menu. (You can also type in OPEN at the command line)
When you first start the MicroSurvey program the Project Manager is automatically brought up on screen to allow you to access your existing drawings and start new drawings.
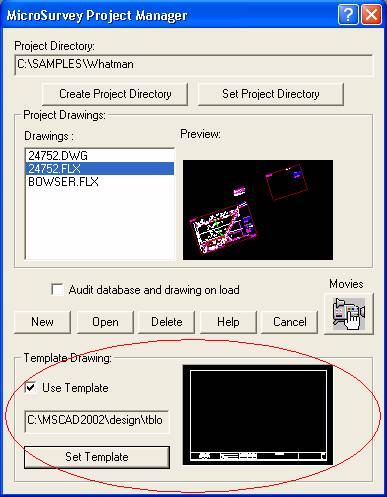
Here is what the Project Manager looks like:
The most common question is "How do I go to the correct directory or folder to access my jobs?"
The current directory that the program is looking in is shown at the top of the dialog box. The example above is set to "C:\Samples" meaning it is looking on "Drive C:" and in the directory "Samples". If this is not the correct location of the job you wish to open then you need to change to this directory so you can find your job.
To select the correct directory (folder) to work in all you need to do is pick on the "Set Project Directory" button located near the top right of the dialog box. The following dialog box will be placed on screen.

To use this dialog to pick your desired directory, simply pick on the yellow folder beside the name you wish to open. If a + sign is to the left of the folder then this indicates that there are more subdirectories available listed under this directory. Picking on the + sign will show you those directories. There is a scroll bar on the right side of the dialog to help you quickly move up or down the list of directories you have on your hard drive. Using a combination of the scroll bar, and the + signs, you should be able to locate the directory you wish to work in. When you see it - pick on the yellow folder and it will open (my example above shows the Whatman folder as being open).‚ You will not see the list of jobs within the folder, at this time.
A few limitations to note:
1) You can not work in the root of a drive. In other words you must be working in a subdirectory. C:\ is not valid but C:\DIRECTORY NAME is valid.
2) Do not work directly on a floppy disk. Always copy your job to the hard drive and work on it there. The reason is that we create several temporary files in the same location as the drawing and the floppy is a very small drive to work on - if we run out of space then you will have a crash.
3) You can not work directly from a CD either due to the fact that it is normally read only. Be sure to copy the job from the CD to a directory on the hard drive and you may also have to ensure that the files are not Read Only (you can confirm this by using Windows Explorer, picking on the file name with your Right mouse button, then pick on the Properties option, with the Left mouse button, from the short menu that appears. Ensure that the Read Only option is off and then hit the Apply button to finish). Some files copied from the internet may also be set to Read Only - be sure to change them as well.
4) Do not use folder structures that are very deep.‚ Very long folder names (and job names) can cause problems when opening or working in a drawing.‚ If you are too deep then you may not see any jobs listed in the project manager, even though you have picked a valid location.‚ You may not have a Viewlog file when a drawing is open.‚ You may have problems saving your job when you are done.‚ Basically, follow the KISS rule (keep is short and simple).
Once you have selected the yellow folder to work in, pick the OK button at the bottom of that same dialog to finish the selection. You will then be taken back to the previous dialog box and the Project Directory at the top of the Project Manager should now display the directory you picked. The example below now shows the selected directory as the default.
On the left side of the dialog, in the white window marked "Drawings:" you will now see the list of all the jobs in this directory. We display FLX, DWG and DXF files all at the same time. The FLX files will have a preview shown in the box to the right, Some DWG and DXF files do not have a preview available.
Pick on the drawing that you wish to work on and then pick the OPEN button below the list of drawings. This will open which ever drawing you have selected. If it was a DWG or DXF file then it will be loaded and converted into our FLX format for saving later.
Note: if you are opening an FLX job (or a DWG file previously saved in MicroSurvey) then you may wish to check the "Audit database and drawing on load" on to ensure that the drawing and the survey database are matched. You do not need to use this check for DXF files (or DWG files coming from another program) as there is no survey database attached to it.
If you are starting a new job then you have 2 choices.
A) You can simply pick on the new button and give the job a name in the dialog box that comes up (as shown below).
Do not attempt to change directories in this dialog box. The only thing you should do is enter in the file name where asked and then pick on the Save button to proceed.
B) You have the option of using a Template to start your job from. If you wish to use a Template then pick on the check box beside the words "Use Template".
Then go to the "Set Template" button and choose the drawing you wish to use as a template and pick on the Open button..
The full name will appear in the small white box above the set template button and a preview, if available, will be seen to the right. Once the Template drawing has been chosen you can then pick on the New button as in "A)" above.
If you have any further questions about any other buttons then please remember that there is a Help button which has every option detailed on the Project Manager. There is also a short movie that will touch on the same topics.
I hope this helps explain how to use the Project Manager.
Created On: May1, 2003
Jason Poitras
Comments