We have had several requests from customers to develop a standardized method of downloading data from the Husky F/S 2 equipped with TDS Survey Pro (Version 4.4.08).‚ The following pages give a detailed set of instructions to accomplish this task.
1) Turn on the Husky and ensure that the TDS program is running.‚ If it is not, type TDS at the DOS prompt and press enter.‚ This will open and run the TDS Survey Pro (Version 4.4.08) software.‚
2) Start MicroSurvey (MS-CAD 2002 or MSX2002) and select the appropriate file name to open (new or existing).‚
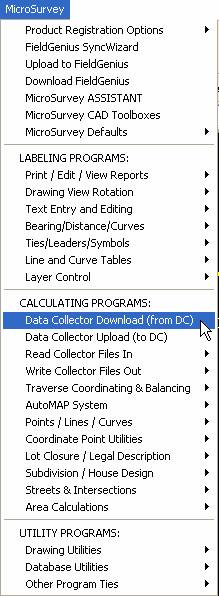
3) Use the MicroSurvey Pull-down Menu and Select Data Collector Download (from DC) as shown below.‚
Or, alternatively, you can choose the Send/Receive Data from Data Collector button from the Assistant
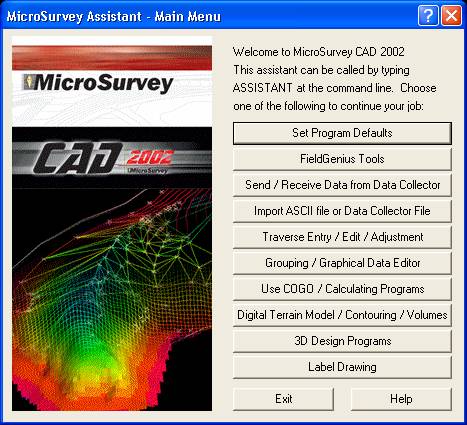
The following Dialog Box will appear if you are using the Assistant.‚ Step is by-passed if you use the MicroSurvey pull down menu.

4) MicroSurvey will then prompt you for the brand of data collector you wish to download from and lets you browse to select the directory the files will be saved to.‚ The following dialog boxes illustrate the directory I used for this example.
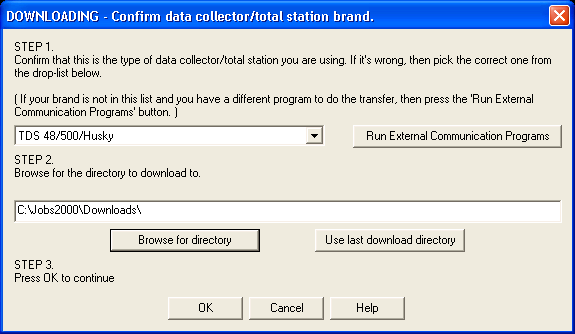
If you want to change the download directory, select the Browse For Directory button and the following dialog box will appear and allow you to change the directory.‚ Simply browse to the appropriate directory and select OK.‚ This will return you to the Download Dialog Box pictured above.

5) Select OK (In the Downloading Dialog Box) and the following dialog box will appear:
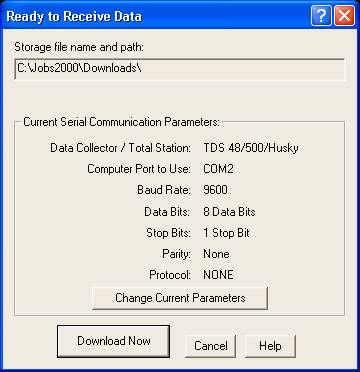
If the current parameters are correct then you can select Download Now.‚ If not, you can change the parameters by selecting Change Current Parameters.‚
6) Once you have pressed the Download Now button, the box shown below describes what keys must be pressed on the Husky in order to start sending the desired data files to MicroSurvey.
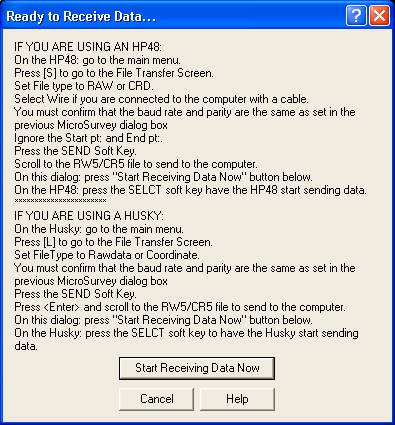
7) You are now ready to start sending the data to MicroSurvey.‚ Select the Start Receiving Data Now button and the following box will appear.
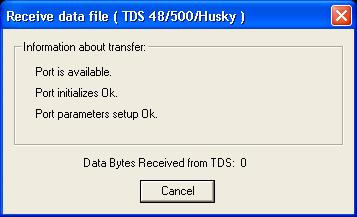
You can see the data is received by the computer from the Husky FS/2 TDS Data Collector.‚
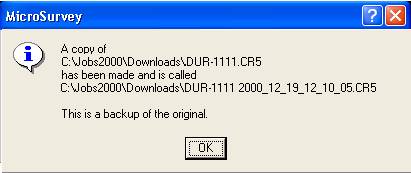
MicroSurvey automatically creates a copy of the download file and stores it in the C:\ Jobs2000\Downloads directory or the folder you selected in Step # 4 as illustrated below.‚ The backup file is a copy of the original data file and should be used if the original become corrupted in any way.
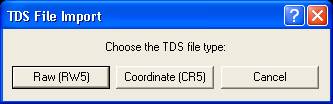
8) After the download is complete, you will be prompted to select the type of file (RW5 or CR5) you wish to read into MicroSurvey.
A)‚ For a Coordinate File
If you choose the Coordinate (CR5) button, you will be prompted to enter the ASCII format of the data collector file you have just downloaded.‚ Be sure to select the correct format for your data collector (As shown below).

Select OK.
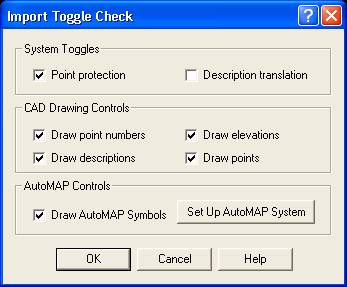
You will then be prompted to select the appropriate system toggles and CAD controls for the drawing file you are about to append.
After you select OK, you will then be prompted to select the name of the CR5 file you wish to import.‚ The following dialog box is an example of this.

Select Open.‚ Your computer will now begin downloading the points into your drawing file.‚ MSCAD will automatically zoom to the extents of the drawing once the import is complete.
B)‚ RAW DATA FILE
If you are downloading a raw data file, the following dialog box will prompt you to choose the RW5 file to import.

Pick on NEW for all new collector files.‚

You will then be asked for the name of the Traverse file.‚ This allows you to have more than one traverse file and choose which one you are working with, as required.‚ (The files named DB_something - are database files - do not touch these for any reason!)

Select Save.‚ This will create a new traverse file called DUR-1111 in the project folder.‚ This information is automatically stored in the database.‚ The next dialog box will prompt you to enter some of the job information.‚ This is entirely optional.‚ Select OK when you have finished entering the information.

The program will now ask if you wish to store the coordinates contained in the raw file.‚ ‚ Select No if you are planning to, or have already downloaded a coordinate file (It is not necessary to download the CR5 (coordinate) file if you make the appropriate edits to the raw traverse file in Step iii below and re-coordinate the traverse in Step iv).‚ Otherwise choose Yes.
Important Note:‚ The Raw data file does not contain any information on rotations or translations that you may have performed in TDS Survey Pro.‚ It contains the raw observations only.‚ You should download your coordinate file first and then download the raw data file and choose No if you have performed translations and/or rotations.‚

The program will now ask you if you want to edit the data file.‚ If you are aware of any errors or omissions in the raw data file then you should select Yes to view and edit the file.‚ If not, select No.‚ If you are duplicating the field edits to the raw data, this is where it is done.

You will now be asked about re-coordinating the traverse.

It is only necessary to do this if you have made any corrections or additions to the raw data file or if you do not wish to download the coordinate (CR5) file.
If you are downloading via the Assistant the program will now return to the Assistant.
This concludes the download process.
Created on: December 20, 2000
Jason Poitras
Comments